
text.email ChatGPT Plugin: Send Texts and Manage Your Account (MCP)
You can now send texts and manage your text.email account through ChatGPT. You can even get ChatGPT to send you text alerts.
We’ve just launched the text.email MCP server (mcp.text.email) to connect ChatGPT to your text.email account.
Once you’ve added it as a ChatGPT plugin, you can have ChatGPT (or Codex) send SMS text messages, MMS messages, and iMessages. It can also manage your account settings and more.
In this article, I’ll cover how to set up the text.email plugin in ChatGPT and a bunch of different ways you can use it.
text.email ChatGPT Plugin: Table of Contents
- How to Add the text.email Plugin to ChatGPT
- How to Call the text.email Plugin in ChatGPT and Codex
- Using the text.email ChatGPT Plugin to Send Texts
- Using the ChatGPT Plugin to Manage Your text.email Account
- Ready to Get Started with the text.email ChatGPT Plugin?
- Reference: Every Tool in the text.email Plugin
How to Add the text.email Plugin to ChatGPT
Here’s how to add the text.email plugin to ChatGPT. It’s a non-technical process that only takes about a minute.
Step 1: Creating the plugin in ChatGPT
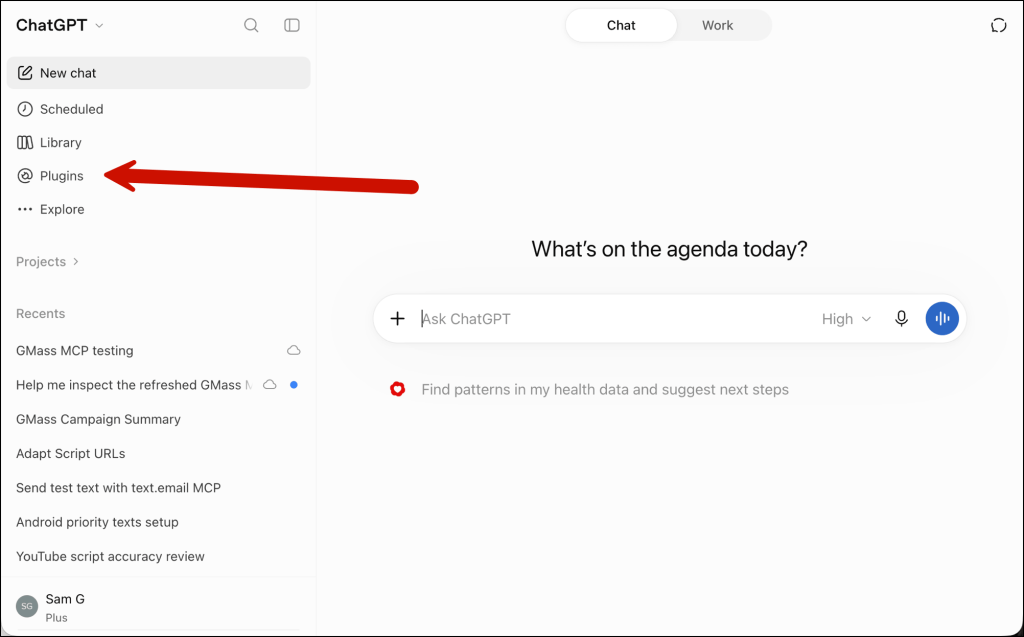
Go to ChatGPT on the web or in the desktop app. Then click on the Plugins link in the sidebar.
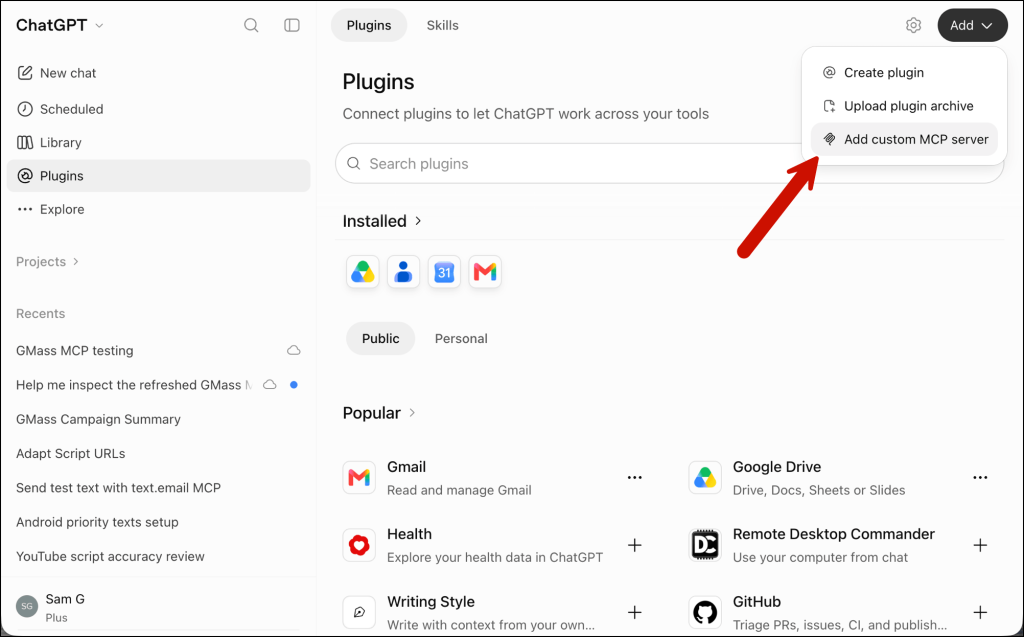
Click on the Add button in the top right. In the dropdown, choose Add custom MCP server.
Enter the details. Name it whatever you want (text.email or something similar) and optionally a description. (You can also enter a custom icon if you’ve really got “I miss Notion in 2019” vibes.)
In the Connection box, enter https://mcp.text.email as the Server URL.
Leave Authentication on OAuth.
Check the I understand and want to continue box.
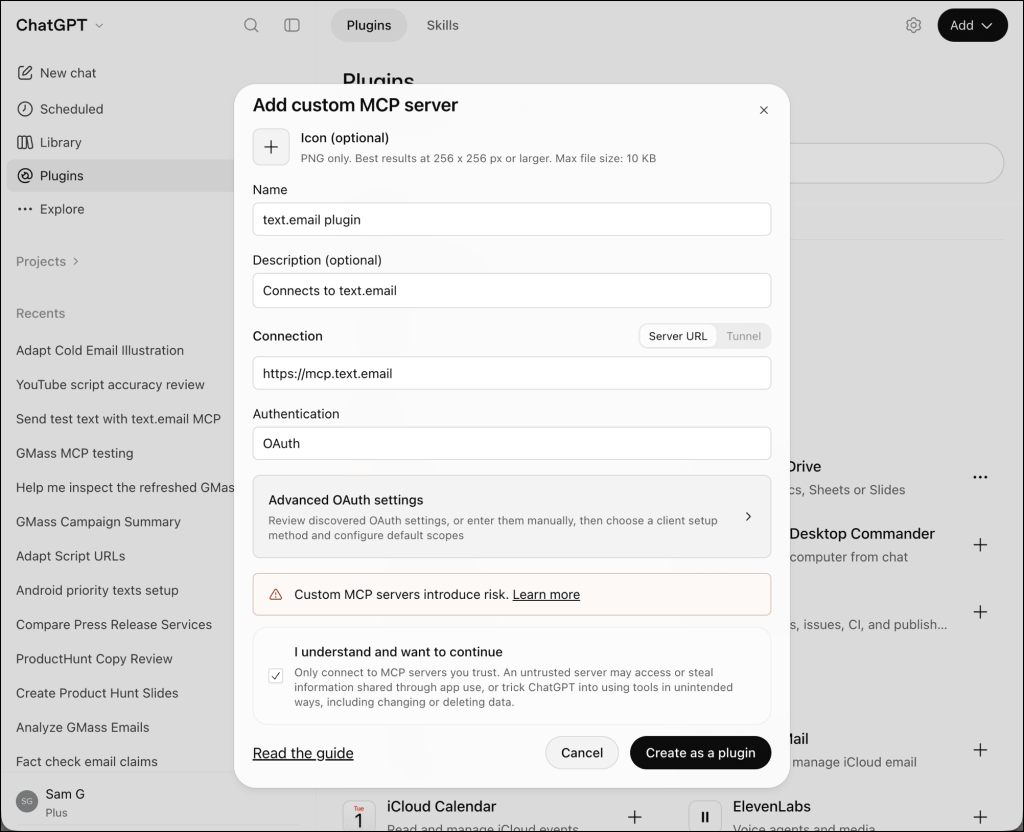
Now click Create as a plugin.
Step 2: Authorizing your text.email account
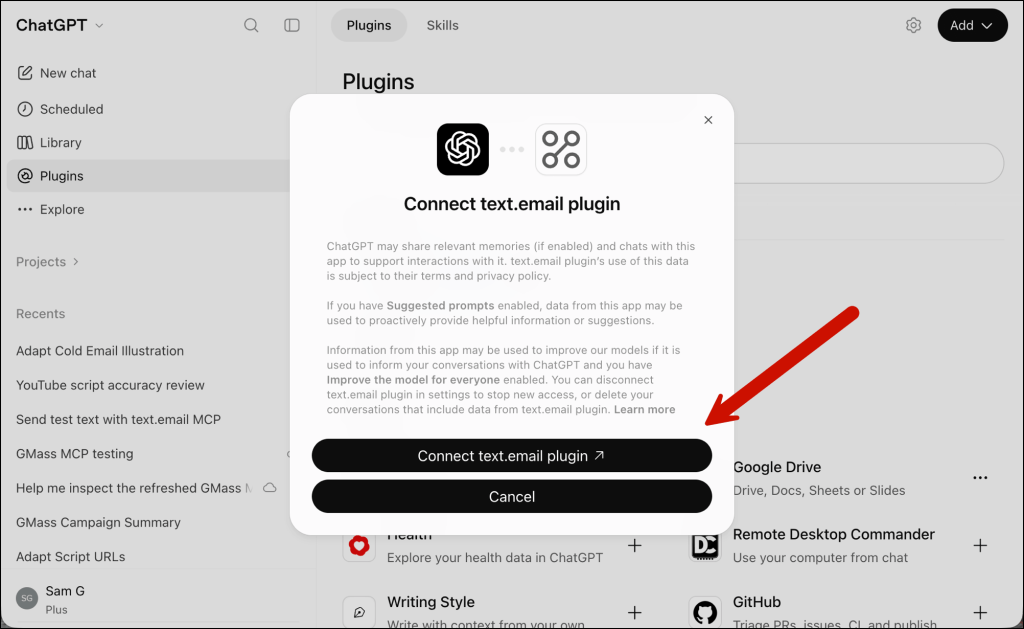
Next you’ll see a screen pop up to connect the plugin. Click the Connect [what you named it] button.
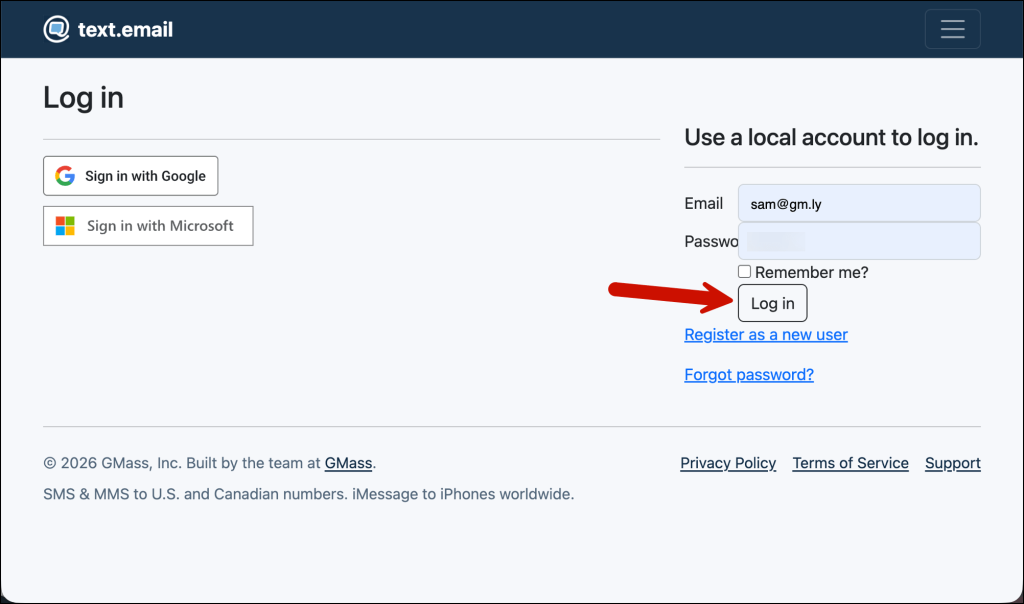
That will take you to the text.email login page.
You’ll now see a screen where you connect your text.email account to ChatGPT. Click Connect ChatGPT to text.email.
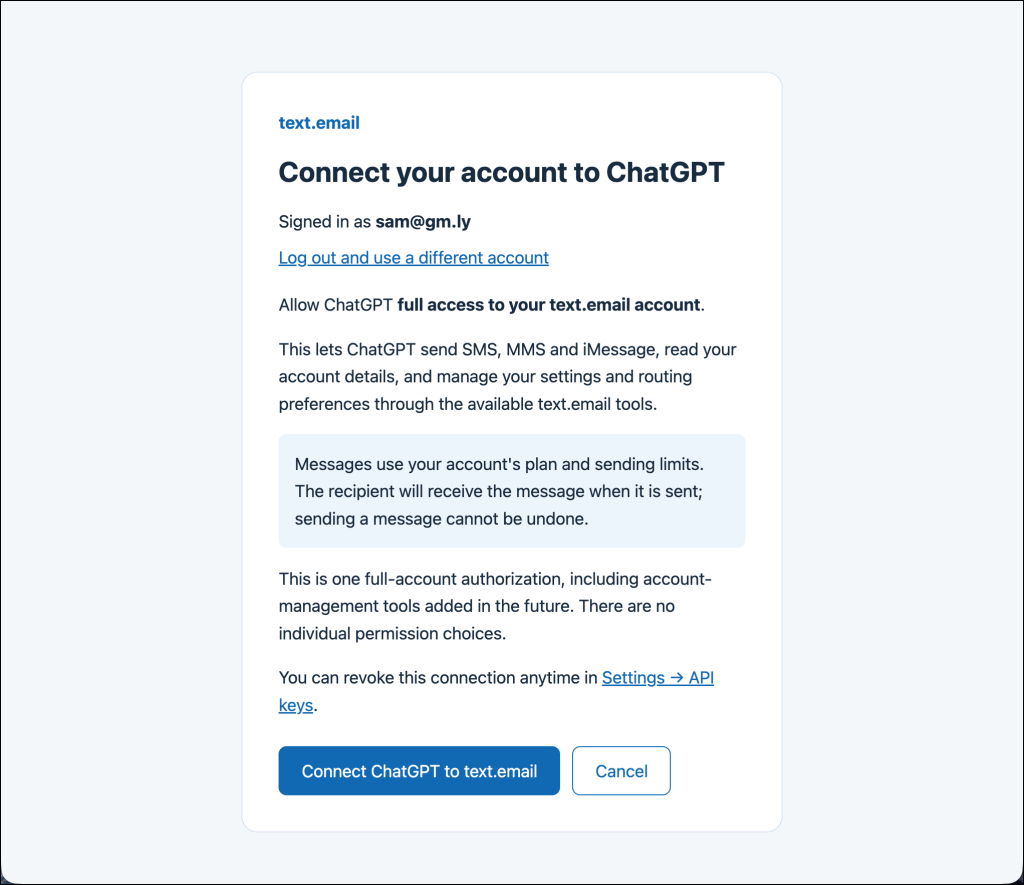
You should be all set from there to use text.email inside ChatGPT.
How to Call the text.email Plugin in ChatGPT and Codex
Here are the different ways to call the text.email plugin.
Using the plugin in a ChatGPT conversation
You can call the plugin directly by typing @ and picking text.email. Or you can say something like “Use the text.email plugin to…”
(In this screenshot below, I typed @ then picked text.email from the list, which is why text.email plugin appears in the box.)
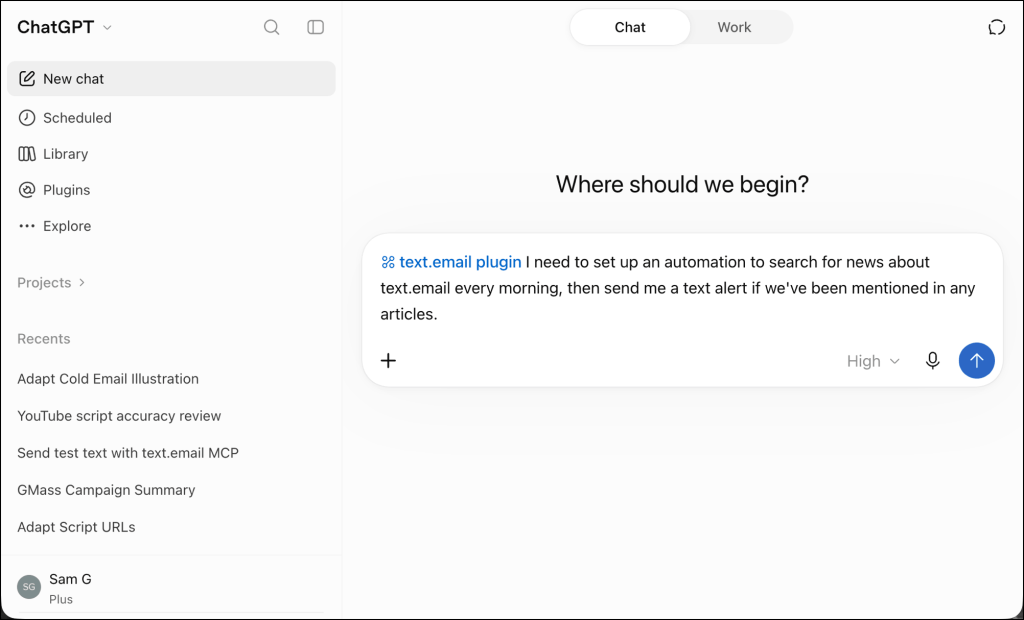
ChatGPT will ask you whatever info it needs (like the phone number to send to) and won’t send any texts until you give it explicit permission.
Using the plugin in Codex (in the app or CLI)
Once you’ve installed the plugin in your ChatGPT account, you’ll be able to call it from Codex — either in the desktop/mobile app or the terminal.
If you’re a CLI-only type, you can add the MCP server directly instead. Run codex mcp add text-email --url https://mcp.text.email, sign in to text.email when prompted, and then start a new session.
Using the text.email ChatGPT Plugin to Send Texts
I’m guessing the first way you’ll want to use the ChatGPT plugin is to send you a text (or recurring texts).
For instance:
- Send this packing list to my phone as an iMessage.
- Text me the address and door code for tonight’s dinner.
- Text my husband that I’m running 20 minutes late because I’m way too deep into vibe coding and to start without me.
(Why did I send the packing list as an iMessage? Because iMessages can be way longer than SMS text messages. So for something long, like a packing list, it will come through in a single iMessage.)
You can also have ChatGPT text you when a long Codex project finishes (or has an error). Or you could set up recurring text alerts on a schedule using ChatGPT’s scheduled tasks.
Plus, if you have ChatGPT monitoring other services for you, from your server to eCommerce store to smart home, you can have it use the text.email plugin to send you critical alerts.
Using the ChatGPT Plugin to Manage Your text.email Account
The plugin can also check your text.email account settings and change them. So you can use it to manage or even set up your account.
For instance, you could:
- Check your plan, account ID, and/or subdomains.
- Authorize new email addresses to send through your account.
- Turn on required acknowledgment and add a new keyword in texts that triggers it.
- Replace your old phone number with a new one.
These features are also really useful if you set up text.email accounts for different clients. (I see you, MSPs.) You can use ChatGPT or Codex to easily manage those accounts and even do things like resending verification emails.
Ready to Get Started with the text.email ChatGPT Plugin?
It’s really quick and (should be) painless to set up the text.email ChatGPT plugin in your account.
And once it’s ready, you can use it to send texts, to have ChatGPT send you texts, and to manage your account — all inside ChatGPT or Codex.
If you read through this article and didn’t come up with ideas for ways you could use the plugin — just ask ChatGPT. It will help you brainstorm and come up with some fantastic ways to bring it into your business.
If you’re already a text.email subscriber, the ChatGPT plugin is part of your account — there’s no extra fee or upgrade or anything like that required. Just follow the instructions above to connect your account.
And if you’re not a text.email subscriber yet, the ChatGPT plugin is just one of the many ways we’re making texting as simple as possible. We have email-to-SMS, email-to-MMS, and email-to-iMessage for all your alerts and other urgent messages. Plus there’s the text.email API if you need to bring texting into your apps.
You can try out text.email right now, with no signup required. Just send an email to your-number@text.email and it should hit your phone as a text a few moments later.
Reference: Every Tool in the text.email Plugin
ChatGPT will figure out which tool to use based on what you ask, so you won’t need this list much.
But here’s the full list of everything the text.email ChatGPT plugin can do for your reference and/or brainstorming.
Sending
send_message: sends a text immediately as SMS (the default), MMS with one image up to 600 KB, or iMessage. (SMS and MMS go to U.S. and Canadian numbers. MMS messages carry a small additional charge and all messages do count toward your monthly allotment.)
Account
get_profile: your permanent account ID, email, and subdomain.get_account: verification, trial, payment, and hold status.get_account_capabilities: your segment limits and your MMS and ACK preferences.resend_verification_email: sends the verification email again.
Settings
get_settings: reads your messaging, routing, and billing settings.update_settings: changes any setting, including subdomain, template, duplicate window, max segments, segment minimizing, MMS handling, attachment handling, required acknowledgment, renewal emails, and billing contacts.
Subdomains
list_subdomains: your current subdomain plus every alias.delete_subdomain_alias: removes an alias.
Authorized senders
list_authorized_senders: the addresses and domains allowed to send through your account.add_authorized_senders: adds more senders to your account.delete_authorized_sender: removes an authorized sender.
Number replacements
list_number_replacements: lists all of your account’s number replacements.set_number_replacement: sends texts meant for an old number to a new number or a distribution list.delete_number_replacement: removes a replacement, so texts go back to the original number.
iMessage routing
list_imessage_numbers: numbers set to prefer iMessage for email-to-text.add_imessage_number: adds a number to that list.delete_imessage_number: takes one off.
Send an email to
your-number@text.email
and receive it as a text in seconds. No signup required.